
In the world of electrical testing, the clamp multimeter emerges as a versatile and indispensable tool. Its unique design allows for non-intrusive current measurements without the need to disconnect circuits.
Whether you’re an experienced electrician or a DIY enthusiast, mastering the art of using a clamp multimeter can significantly simplify troubleshooting and monitoring electrical systems. This article serves as a comprehensive guide, offering step-by-step instructions on how to use clamp multimeter.
From understanding its various functions and settings to positioning it correctly around conductors and interpreting the readings, readers will gain the knowledge needed to confidently wield this tool. Whether you’re measuring AC or DC current, monitoring voltage, or assessing resistance, the clamp multimeter empowers you to efficiently diagnose issues, ensure system performance, and maintain electrical safety.
What Is a Clamp Multimeter and Its Functions?
A Clamp Multimeter, also known as an AC/DC Current Clamp Meter, is a powerful tool used by electricians and other electrical professionals. It consists of two parts: the clamp itself and the meter that reads the current flow through the clamp. The clamp is placed around a wire or cable, while the meter measures the current passing through it. This allows the user to accurately measure current, voltage, and resistance in electrical circuits.
The functions of a Clamp Multimeter include measuring AC/DC current, resistance, capacitance, and frequency. It can also be used to detect faults in wiring or circuits and to troubleshoot equipment malfunctions. Additionally, it is commonly used by technicians when diagnosing problems with motors or other electrical systems.
In order to successfully use a Clamp Multimeter, it is important that the user read and understand all instructions provided with the device. The clamp should be connected to an appropriate test lead before it is attached around the wire or cable in question. The meter should then be used to measure current, voltage, and resistance as desired.
Benefits of Using a Clamp Multimeter for Measuring Current
Using a clamp multimeter is an effective way to measure current without having to cut wires. Unlike traditional multimeters, which require you to disconnect and reconnect the leads in order to take current readings, a clamp meter allows you to measure current without ever needing to cut into wiring or switch out test probes. This makes it much easier and faster for technicians and engineers alike to get accurate readings of current, voltage, and other electrical parameters safely.
Another benefit of using a clamp multimeter is that it can measure both AC and DC current. Traditional multimeters are typically limited to just measuring AC or DC current but with a clamp meter you can measure both. This makes it ideal for applications where AC and DC currents may be present at the same time.

Clamp meters are also great for troubleshooting electrical issues in tight or hard to reach spaces. The clamp can be attached around wires, cables or other objects and the readings taken without any need to disconnect them. This makes it much easier and safer to measure current in places where a traditional multimeter would be difficult or impossible to use.
Overall, using a clamp multimeter is an effective tool for measuring current and can help save time, effort and money in the long run. It’s also much safer than traditional methods of measuring current as there are no exposed wires or connections to worry about. By taking advantage of this technology, technicians can quickly get accurate readings without compromising safety.
16 Steps How to Use Clamp Multimeter
Step 1: Understand the Basics
To embark on the journey of effectively using a clamp multimeter, it’s crucial to grasp its underlying principles. A clamp multimeter is a specialized device that combines the functions of a standard multimeter with a unique clamp mechanism. This clamp allows you to measure electrical current without the need to break the circuit or make direct contact with live wires. The convenience and safety provided by this tool make it an essential companion for professionals and enthusiasts in the field of electronics and electrical systems.
Step 2: Safety First
Working with electricity demands utmost attention to safety. Before you begin, equip yourself with proper personal protective equipment (PPE). Safety glasses, insulated gloves, and appropriate clothing are essential to shield yourself from potential electrical hazards. Furthermore, ensure that your clamp multimeter is in good condition and that the testing environment is safe and well-lit. Verify that you are working with circuits that are properly isolated and free from potential dangers.

Step 3: Select the Right Clamp Multimeter
Choosing the appropriate clamp multimeter for your needs is a critical step. Consider factors such as the range of AC and DC current it can measure, voltage range, accuracy level, as well as any additional features like data logging, temperature measurement, and auto-ranging capabilities. Picking a multimeter that aligns with your intended applications ensures accurate measurements and efficient troubleshooting.
Step 4: Set Up the Multimeter
Before diving into measurements, acquaint yourself with the multimeter’s controls and functions. Understand how to switch between measurement modes, select ranges, and interpret the display. Depending on what you intend to measure—be it current, voltage, resistance, or other parameters—set the multimeter to the appropriate mode.
Step 5: Prepare the Circuit
Ensure safety by preparing the circuit you intend to test. If possible, turn off the power to the circuit completely. If shutting down the power source is not feasible, ensure that you follow appropriate safety procedures and use suitable protective gear to mitigate risks.
Step 6: Open the Clamp
Open the clamp jaws wide enough to comfortably fit around the conductor you are testing. It’s essential to avoid overextending the clamp, as this could damage the device or the conductor itself.
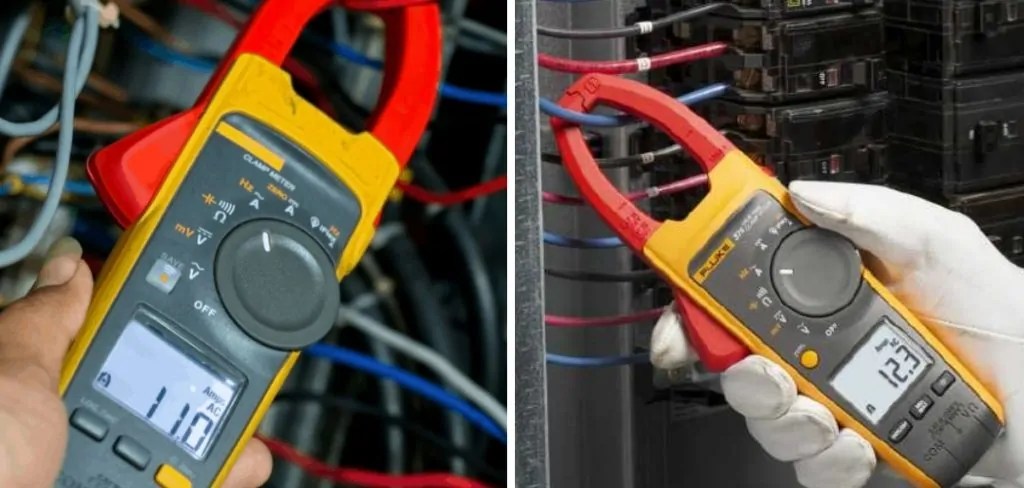
Step 7: Position the Clamp
Accurate measurements hinge on proper clamp positioning. Place the opened clamp around the conductor, making sure that the clamp’s jaws are aligned with the direction of current flow. The arrow or marking on the clamp should point towards the source of the current.
Step 8: Close the Clamp
Gently close the clamp around the conductor, ensuring a snug fit without applying excessive force. The goal is to maintain a secure connection while preventing any damage to the clamp or the conductor.
Step 9: Read the Display
With the clamp securely positioned around the conductor, focus your attention on the multimeter’s display. The measurements you observe will depend on the mode you selected—current, voltage, or resistance. Take note of the values displayed and any units provided by the multimeter.

Step 10: Interpret the Readings
Interpreting the multimeter readings is a crucial aspect of the process. If you’re measuring AC current, remember to consider the direction of current flow as indicated by the arrow on the clamp. For voltage and resistance measurements, pay close attention to the units and the range of values on the multimeter’s display. If a reading exceeds the meter’s range, consider using a higher range setting. Lastly, always record the results and perform multiple readings to ensure accuracy.
Step 11: AC vs. DC Current
It’s important to understand that most clamp multimeters are primarily designed for measuring AC current. If you need to measure DC current, ensure that your multimeter is capable of doing so, and follow the appropriate procedures and settings.
Step 12: Average and Dynamic Measurements
In situations where the current values are not steady, consider taking multiple measurements and calculating the average. This approach is particularly useful for dynamic systems where current values are subject to fluctuations. To calculate an average, take several measurements and add the results together. Then, divide that total value by the number of measurements taken. It is important to note that taking a measurement involves more than just setting up the Clamp Multimeter; it also includes noting all relevant information such as temperature, environmental conditions, etc.
Step 13: Verifying Accuracy
Regularly validating the accuracy of your clamp multimeter is a good practice. This can be done by comparing its readings with those of another trusted measuring device. Calibrating your multimeter periodically ensures reliable measurements and confident diagnoses.
Step 14: Recording and Documentation
Maintain a systematic record of your measurements and observations. Documenting your findings serves as a valuable reference for tracking changes over time, comparing measurements, and diagnosing issues in the future.
Step 15: Troubleshooting and Problem Solving
Should you encounter unexpected readings or discrepancies, troubleshoot the possible sources of error. Double-check your connections, the positioning of the clamp, and the multimeter settings. Additionally, consider any external factors, such as nearby magnetic fields, that could influence your measurements.
Step 16: Continuing Education
Stay abreast of the latest developments related to your clamp multimeter. These tools often come equipped with advanced functions beyond basic measurements, such as frequency measurement, capacitance measurement, and temperature measurement. Continuously expanding your knowledge enhances your proficiency in using the clamp multimeter to its fullest potential.

Conclusion
To conclude, using a clamp multimeter effectively is an invaluable skill to master if you are looking to troubleshoot issues with your electrical system. This tool will allow you to read inductive AC and DC voltage and diagnose electrical problems in both residential and commercial spaces quickly and accurately.
With the proper preparation and knowledge, using a clamp multimeter correctly can save time and money that would otherwise be spent on hiring a professional or buying additional tools. Additionally, understanding exactly how this device works is crucial for avoiding dangerous situations that could arise due to incorrect usage.
So don’t be afraid to take the plunge and become familiar with this versatile tool – it may just come in handy someday! Finally, don’t forget our main topic: How to Use Clamp Multimeter. Now that you know all there is to know about these reliable devices, start putting them into action and reap the rewards of accurate readings every time!
Occupation: Expert in Hardware Tools
Education: Bachelor’s Degree in Mechanical Engineering
Profile:
Enrique Howard is a seasoned expert in the field of hardware tools, with a robust background in mechanical engineering that underpins his extensive knowledge and skills. Holding a degree in mechanical engineering, Enrique has cultivated a deep understanding of tool design, mechanics, and the intricacies of various hardware applications. His educational foundation empowers him to innovate and refine tools that enhance efficiency and effectiveness in a wide range of industries.
Professional Focus:
Enrique’s professional focus encompasses a diverse array of areas within the hardware tools sector, including:
- Tool Design and Development: Leveraging his engineering expertise, Enrique specializes in designing tools that meet specific user needs, ensuring optimal performance and durability.
- Material Science: Understanding the properties of various materials allows him to recommend the best tools for specific applications, enhancing safety and efficiency.
- Ergonomics: He emphasizes the importance of ergonomic design in tools, striving to create solutions that reduce user fatigue and improve comfort during prolonged use.
- Sustainability: Enrique is committed to promoting environmentally friendly practices in tool manufacturing, advocating for the use of sustainable materials and processes.
- Education and Training: Through workshops, seminars, and written content, he focuses on educating both professionals and DIY enthusiasts about tool selection, maintenance, and safe usage practices.
Throughout his career, Enrique has worked on numerous projects, collaborating with manufacturers and craftsmen to develop cutting-edge hardware solutions. His expertise spans from traditional hand tools to advanced power tools, allowing him to contribute significantly to both professional and DIY communities.
As an author, Enrique shares his insights through articles, guides, and tutorials, aimed at helping enthusiasts and professionals alike navigate the complexities of hardware tools. His passion for education and practical application drives him to continually explore new technologies and methodologies, making him a trusted voice in the hardware industry.
Whether he’s writing about the latest tool advancements or providing practical tips for tool maintenance, Enrique Howard is dedicated to empowering others with the knowledge and skills necessary to excel in their hardware endeavors.