
If you’re looking for a fast and painless way to break down and access the many parts of electronics, cortex screws provide an ideal solution. Whether it’s taking apart appliances like electronic razors or smartphones, these screws are designed with convenience in mind.

However, removing them can prove tricky at times, and so we’ve put together this step-by-step guide on how to remove cortex screws when it comes to tackling that task. Read on for some essential information about cortex screws – from what they look like and why you might need them to how best to unlock their hidden depths.
What Is the Best Way to Remove Deck Screws?
When working with deck screws, it is important to get the job done right. One of the most efficient and effective ways to remove deck screws is to use a screwdriver or drill bit designed specifically for removing them. Specialty bits are available in both manual and cordless varieties, so it’s easy to find one that fits your particular project.
When using a screwdriver or drill bit, be sure to match the size of the bit with the size of the screw head. This will ensure that you’re applying enough torque to loosen and remove it without damaging it in the process. To get started, insert the bit into the center of the screw head, and turn the screwdriver or drill clockwise until it’s loose enough to remove by hand.
Once the screw has been loosened, carefully use a pair of needle-nose pliers to grasp and pull it out. Be sure to wear gloves if you are dealing with rusty screws in order to protect your hands from injury.
It’s also important to keep in mind that there are a variety of deck screws available, so it’s important to choose the right one for your project. Cortex screws are often used because they have a unique thread pattern that provides superior grip and holding power and can be used on both hard and softwoods. They also come in a variety of sizes and lengths, making them ideal for projects that require different depths of penetration.
10 Methods How to Remove Cortex Screws
1. Use a Power Drill
If you have a power drill, you can quickly remove the screws with little effort. Simply set the drill to reverse and hold it steady as you unscrew the cortex screws. Make sure that you do not apply too much pressure. Otherwise, you could end up damaging the screws or your drill. Depending on the size and material of the screws, you may need to use a specific drill bit for the job. Although this method is much faster, make sure to take your time when unscrewing the screws.
2. Use a Screwdriver
If you don’t have a power drill, you can use a screwdriver to remove the screws. However, this will require more effort on your part. Start by inserting the screwdriver into the head of the screw and then twist it counterclockwise until the screw comes loose. If the screw is stuck, you may need to use a bit more force.
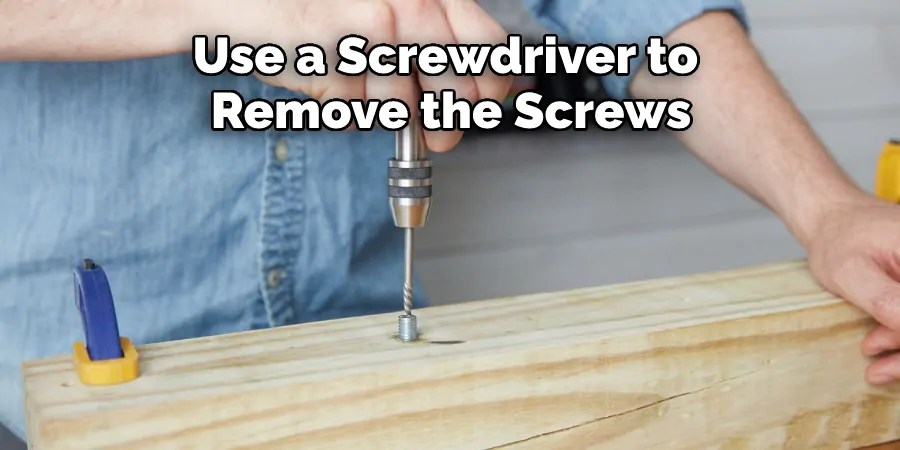
Be careful not to strip the head of the screw since this could make it harder to remove. Once the screw is loose, you can easily pull it out. After that, continue doing this for each of the screws until all of them have been removed.
3. Use Pliers
If the screws are particularly tight, you may need to use pliers to remove them. Simply grip the head of the screw with the pliers and twist counterclockwise until the screw comes loose. This method is useful for removing screws that are stuck but be careful not to strip the head of the screw by applying too much pressure.
Also, make sure to use a pair of pliers with anti-slip grips, as this will provide more control and be less likely to slip off the screw head. Additionally, you may need to use a lubricant such as oil or WD-40 in order to loosen the screws prior to using pliers. If you do not have any lubricant available, try using a dab of soap and water to help loosen the screws first.
4. Use a Hammer
If you’re having trouble getting the screws loose with a power drill or screwdriver, you can try using a hammer. Gently tap the head of the screw with the hammer until it loosens enough that you can remove it by hand. Make sure to wear safety glasses when using a hammer and be careful not to damage the screw or surrounding material.
Although this may not be the most elegant and efficient way to remove Cortex screws, it can be effective in some cases. If you are having trouble removing the screws with other methods, it may be worth trying this. It is important to be careful and make sure not to damage the surrounding material or the screw itself.
5. Apply Heat.
If the screws are still proving to be stubborn, you can try applying heat to them. This will help to loosen any rust or corrosion that may be holding them in place. Simply hold a heat gun or blow the torch up to the head of the screw for a few seconds before attempting to remove it again.

Be careful not to hold the heat for too long, as this may damage the screws. Once you have applied the heat, let it cool for a few minutes, and then try removing the screws again. You may find that the heat has made it much easier to remove them.
6. Use WD-40 or Another Lubricant
Another option is to use WD-40 or another lubricant on the screws before attempting to remove them. This will help to loosen any rust or corrosion that may be holding them in place. Simply spray WD-40 onto the head of the screw and let it sit for a few minutes before attempting to remove it again.
Make sure to read the instructions on the packaging of your lubricant and use accordingly. Once you have done this, you should be able to remove the screw without any issue. If the screw still won’t budge, you may need to use a stronger lubricant or drill out the screw. Depending on your situation, you may need to consult with a professional.
7. Use an Impact Driver
If you have access to an impact driver, this is also a great way to remove cortex screws. An impact driver works by using pressure and vibration to loosen the screw instead of simply turning it in a circle like with a regular screwdriver. Simply attach the appropriate bit onto the impact driver and then press down against the head of the screw until it comes loose enough that you can remove it by hand.

Be sure to hold the screw in one place while you apply pressure, or else it may spin and damage the head. Also, be careful not to over-torque the screw, or else it could break off, making it impossible to remove. Once you are able to turn it by hand, use your regular screwdriver to remove the rest of the way.
8. Use an Air Ratchet
An air ratchet is similar to an impact driver but uses air pressure instead of vibrations to loosen stubborn screws. Attach the correct bit for your type of screw, and then turn on your compressor before pressing down on the head of the screw until it is released.
Do not press too hard, or you may damage the head of the screw. Make sure to turn off the compressor before removing your bit from the screw head. With an air ratchet, you should be able to loosen even the most stubborn screws with ease. If the screw still does not budge, you may need to try another method.
9. Use a Hacksaw or Reciprocating Saw
If your screws are particularly stubborn, you may need to resort to cutting them off with a hacksaw or reciprocating saw. This should only be done as a last resort, and you should take extra care not to damage the surrounding material when doing so.
If possible, use a saw blade specifically designed for cutting metal. Once the screws are cut, you can remove them with pliers or other tools. Be sure to wear protective gloves and use eye protection when cutting the screws. When finished, make sure to dispose of the cut pieces safely.

10. Call a Professional.
If all else fails, you can always call in a professional who will have the right tools and experience needed to get the job done quickly and safely without damaging anything in the process. They will also be able to advise on any potential issues that may arise while attempting to remove the cortex screws.
Conclusion
If you find yourself in need of removing cortex screws, don’t fret. With the proper tools and a little know-how, you can get the job done quickly and easily. Be sure to use caution when working with power tools, and always follow the manufacturer’s instructions.
With a little care and attention, you’ll have those screws removed in no time. Thanks for reading, and we hope this has given you some inspiration on how to remove cortex screws!
Occupation: Expert in Hardware Tools
Education: Bachelor’s Degree in Mechanical Engineering
Profile:
Enrique Howard is a seasoned expert in the field of hardware tools, with a robust background in mechanical engineering that underpins his extensive knowledge and skills. Holding a degree in mechanical engineering, Enrique has cultivated a deep understanding of tool design, mechanics, and the intricacies of various hardware applications. His educational foundation empowers him to innovate and refine tools that enhance efficiency and effectiveness in a wide range of industries.
Professional Focus:
Enrique’s professional focus encompasses a diverse array of areas within the hardware tools sector, including:
- Tool Design and Development: Leveraging his engineering expertise, Enrique specializes in designing tools that meet specific user needs, ensuring optimal performance and durability.
- Material Science: Understanding the properties of various materials allows him to recommend the best tools for specific applications, enhancing safety and efficiency.
- Ergonomics: He emphasizes the importance of ergonomic design in tools, striving to create solutions that reduce user fatigue and improve comfort during prolonged use.
- Sustainability: Enrique is committed to promoting environmentally friendly practices in tool manufacturing, advocating for the use of sustainable materials and processes.
- Education and Training: Through workshops, seminars, and written content, he focuses on educating both professionals and DIY enthusiasts about tool selection, maintenance, and safe usage practices.
Throughout his career, Enrique has worked on numerous projects, collaborating with manufacturers and craftsmen to develop cutting-edge hardware solutions. His expertise spans from traditional hand tools to advanced power tools, allowing him to contribute significantly to both professional and DIY communities.
As an author, Enrique shares his insights through articles, guides, and tutorials, aimed at helping enthusiasts and professionals alike navigate the complexities of hardware tools. His passion for education and practical application drives him to continually explore new technologies and methodologies, making him a trusted voice in the hardware industry.
Whether he’s writing about the latest tool advancements or providing practical tips for tool maintenance, Enrique Howard is dedicated to empowering others with the knowledge and skills necessary to excel in their hardware endeavors.