
Drywall screw pops can be an unsightly and frustrating issue for homeowners. These annoying bulges or depressions on the wall’s surface occur when the drywall screws become loose and push through the joint compound, creating noticeable imperfections. While they may seem daunting to fix, fear not, as this article will provide you with a comprehensive guide on how to fix drywall screw pops effectively.

We will explore step-by-step methods to repair these blemishes and restore the smooth appearance of your walls. From securing loose screws to properly patching and finishing the affected areas, you’ll gain valuable insights to tackle this common drywall problem like a pro. Say goodbye to unsightly screw pops and restore the aesthetic integrity of your walls with ease.
Understanding What Drywall Screw Pops Are
Drywall screw pops are common issues that occur when screws are driven too deep into the drywall. They can also happen if the screws weren’t properly positioned in the stud before being inserted into the wall. When this happens, it causes a raised bump or knot in the wall surface. Additionally, they can cause the drywall paper to separate from the gypsum core, allowing the paint to chip and peel.
If you’re dealing with a drywall screw pop, it’s important to act quickly in order to prevent further damage. Fortunately, there are some easy steps that you can take in order to repair this issue. Below we’ll outline how to fix drywall screw pops and get your wall looking good as new!

Importance of Timely Repair to Prevent Further Damage
One of the most important factors in successfully repairing drywall screw pops is to take action as soon as possible. If left unrepaired, the screws are likely to continue backing out of the wall and cause further damage. Over time this could lead to larger issues such as more severe cracks in the wall or large areas of drywall needing replacement instead of simply patching up a few holes from popped out screws.
Taking immediate steps to diagnose and fix the problem can help prevent these unwanted consequences down the line. With that said, it’s important to make sure you have identified why your drywall screw pops are occurring before you start repairs so that you know exactly what needs to be done for a successful resolution.
Once you have identified the root cause of your drywall screw pops, you can begin making repairs. Start by evaluating if any structural damage has occurred that needs to be addressed. If the drywall has cracked or become loose, it may need to be replaced rather than simply patched over. Structural repairs should be done before any patching of the wall.
If the drywall does not need to be replaced, patching the holes or cracks can help restore a smooth surface and make your walls look like new again. After patches are applied, you will want to go back in with screws and apply proper torque so that they don’t pop outward again. You may also need to use longer screws if the drywall has become thin or if the original screw holes have become enlarged.

10 Methods How to Fix Drywall Screw Pops
Method 1: Locate the Screw Pops
Before embarking on the process of fixing drywall screw pops, it is essential to conduct a thorough inspection of the affected wall. Drywall screw pops are typically visible as small bulges or depressions on the wall’s surface, signaling the presence of loose screws or separated joint compound.
To locate these problem areas, carefully examine the entire wall, paying close attention to seams, corners, and areas where screws are commonly placed. As you identify each screw pop, mark it with a small piece of masking tape or a pencil to facilitate easy reference during the repair process.
Method 2: Secure Loose Screws
The first step in addressing drywall screw pops is to ensure that the loose screws are securely fastened. Using a screwdriver, carefully tighten each loose screw without overdriving them, as this can lead to further damage or create new screw pops.
In cases where the drywall has been stripped around the screw, it is best to remove the damaged screw entirely and replace it with a slightly larger one that will securely anchor the drywall to the wall stud or anchor point. By ensuring that the screws are firmly in place, you establish a solid foundation for the repair work and prevent future screw pops from occurring.
Method 3: Remove Loose Joint Compound
With the loose screws secured, it’s time to address the compromised joint compound around the screw pops. Use a utility knife or a drywall saw to carefully remove the loose or damaged joint compound. It is crucial to create a clean and even surface around the screw pop area, as this will ensure a smooth and seamless repair.
Take care not to damage the underlying drywall while removing the joint compound. Once the joint compound has been removed, fill in the area using a drywall patching compound. Spread the patching compound evenly into and around the screw pop, taking care to create a smooth and even surface.
Method 4: Apply Joint Compound
After preparing the area, it’s time to apply fresh joint compound to fix the screw pops. Using a putty knife or a drywall trowel, spread a thin layer of joint compound over the affected area, ensuring that it covers the screw head and any surrounding damage.
Feather the edges of the joint compound outward to blend it smoothly with the rest of the wall surface. This feathering technique creates a gradual transition from the repaired area to the undamaged portion of the wall, resulting in a more natural and inconspicuous finish. Allow the joint compound to dry thoroughly according to the manufacturer’s instructions.
Method 5: Sand the Repaired Area
Once the joint compound has dried, the next step is to sand the repaired area. Use fine-grit sandpaper or a sanding sponge to gently sand the joint compound in a circular motion. The goal is to achieve a smooth and even finish that seamlessly integrates with the surrounding wall.

Take care not to oversand or create a depression in the joint compound, as this can result in an uneven surface that will be noticeable once painted. Once the area is sanded, use a damp cloth to wipe off any dust particles and debris created by the sanding process before you move onto painting the wall.
Method 6: Apply a Second Coat of Joint Compound
In some cases, a single coat of joint compound may not be sufficient to completely cover the screw pop and achieve a seamless finish. If necessary, apply a second coat of joint compound over the repaired area.
This additional layer helps to fill in any imperfections or slight depressions left by the first coat. As with the initial application, feather the edges of the second coat to ensure a smooth and gradual transition. Allow the second coat of joint compound to dry thoroughly.
Method 7: Sand and Feather the Second Coat
After the second coat of joint compound has dried, it’s time to sand the area once more to achieve a uniform and smooth surface. Gently sand the joint compound, feathering the edges as needed to ensure a seamless blend with the surrounding wall. Wipe away any dust from the sanding process with a damp cloth to prepare the surface for priming and painting.
Method 8: Prime the Repaired Area
Before repainting the repaired area, it is essential to apply a coat of primer. Priming prepares the surface for paint, ensures proper adhesion, and helps to achieve an even color when painting over the repaired spot.
Apply the primer according to the manufacturer’s instructions, using a brush or a roller to cover the repaired area thoroughly. Allow the primer to dry completely before painting. Applying a second coat of primer may be necessary for deeper repairs or larger areas. When finished, the repaired area should be ready for painting.
Method 9: Repaint the Wall
After the primer has dried, repaint the entire wall or the affected area with the desired paint color. Use a paint roller or brush to achieve a consistent finish that matches the surrounding wall. It is crucial to blend the new paint with the existing wall color to create a seamless appearance.
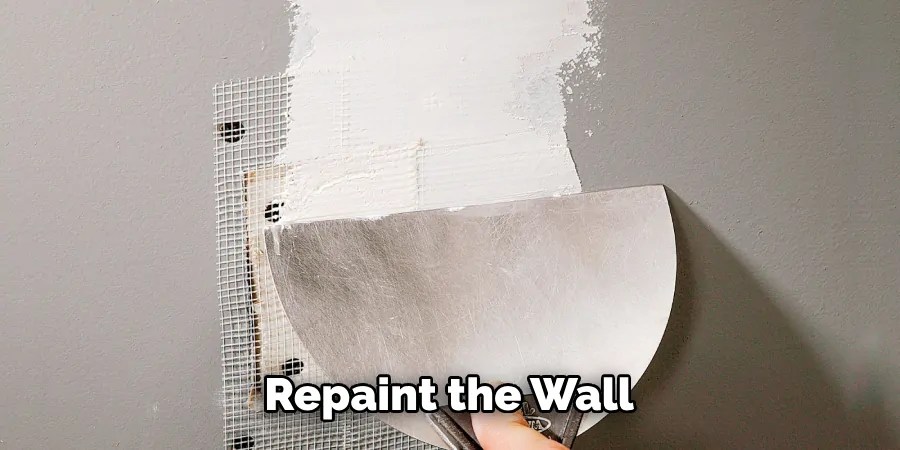
Allow the paint to dry completely before inspecting the repair for any touch-ups. Once you are satisfied with the result, your repair is complete and the drywall screw pops should no longer be visible.
Method 10: Texture the Wall (if necessary)
In some instances, the repaired area may have a different texture than the rest of the wall, which can be visually distracting. To ensure a seamless finish, consider applying texture to the repaired spot. Use a texture spray, texture roller, or a drywall trowel to match the texture of the surrounding wall.
Allow the texture to dry before priming and painting the repaired area. This step ensures that the repaired spot seamlessly blends with the rest of the wall, making the repair virtually undetectable.
Conclusion
To end up, drywall screw pops can be easily fixed with a few helpful techniques. Despite the fact that this annoying issue may seem daunting, remember that it is just cosmetic damage and nothing more. With just a few tools such as a drill bit, screwgun, putty knife, and joint compound laid out in front of you, you are ready to fix those pesky drywall screw pops yourself.
In addition to being an inexpensive way to repair your walls, you’ve also gained valuable DIY experience. Now all that’s left to do is test out these tips and tricks on How to Fix Drywall Screw Pops and see if they work for you! Good luck!
Occupation: Expert in Hardware Tools
Education: Bachelor’s Degree in Mechanical Engineering
Profile:
Enrique Howard is a seasoned expert in the field of hardware tools, with a robust background in mechanical engineering that underpins his extensive knowledge and skills. Holding a degree in mechanical engineering, Enrique has cultivated a deep understanding of tool design, mechanics, and the intricacies of various hardware applications. His educational foundation empowers him to innovate and refine tools that enhance efficiency and effectiveness in a wide range of industries.
Professional Focus:
Enrique’s professional focus encompasses a diverse array of areas within the hardware tools sector, including:
- Tool Design and Development: Leveraging his engineering expertise, Enrique specializes in designing tools that meet specific user needs, ensuring optimal performance and durability.
- Material Science: Understanding the properties of various materials allows him to recommend the best tools for specific applications, enhancing safety and efficiency.
- Ergonomics: He emphasizes the importance of ergonomic design in tools, striving to create solutions that reduce user fatigue and improve comfort during prolonged use.
- Sustainability: Enrique is committed to promoting environmentally friendly practices in tool manufacturing, advocating for the use of sustainable materials and processes.
- Education and Training: Through workshops, seminars, and written content, he focuses on educating both professionals and DIY enthusiasts about tool selection, maintenance, and safe usage practices.
Throughout his career, Enrique has worked on numerous projects, collaborating with manufacturers and craftsmen to develop cutting-edge hardware solutions. His expertise spans from traditional hand tools to advanced power tools, allowing him to contribute significantly to both professional and DIY communities.
As an author, Enrique shares his insights through articles, guides, and tutorials, aimed at helping enthusiasts and professionals alike navigate the complexities of hardware tools. His passion for education and practical application drives him to continually explore new technologies and methodologies, making him a trusted voice in the hardware industry.
Whether he’s writing about the latest tool advancements or providing practical tips for tool maintenance, Enrique Howard is dedicated to empowering others with the knowledge and skills necessary to excel in their hardware endeavors.