
Are you looking to connect wires neatly and organizedly? A terminal block is a simple and efficient solution for this task. This versatile tool can be used in various electrical applications, making it an essential component in any toolbox.

A terminal block is a crucial component in electrical systems, designed to connect and secure wires while providing a safe and organized interface for electrical connections. These devices come in various configurations, facilitating the integration of multiple wires while ensuring that connections remain stable and reliable.
This guide will walk you through the essential steps on how to use a terminal block, including choosing the right type for your project, properly stripping and inserting wires, and troubleshooting common issues. Whether you’re a DIY enthusiast or a seasoned electrician, understanding how to utilize terminal blocks can enhance your wiring practices and contribute to safer, more efficient electrical systems.
What Will You Need?
Before we discuss using a terminal block, let’s review the materials and tools you’ll need to get started.
- Terminal Block: The most crucial component for this task is, of course, a terminal block. Depending on your specific needs, these can be found in various sizes and configurations.
- Wires: You will need wires of appropriate size for your project. Stranded cables are usually preferred for use with terminal blocks.
- Wire Stripper: A wire stripper is a specialized tool to remove insulation from the end of wires.
- Screwdriver: Depending on the type of terminal block you choose, you may need a screwdriver to secure connections.
- Labeling Materials: If you’re working on a complex system, it’s helpful to label your wires and terminal blocks for easy identification.
Once you have all the necessary materials and tools, it’s time to start using a terminal block.
9 Easy Steps on How to Use a Terminal Block
Step 1: Choose the Right Terminal Block
Before you begin wiring, selecting the right type of terminal block for your project is essential. Terminal blocks come in various shapes and sizes, each with unique features and functions. Some common types include:
- DIN Rail Terminal Blocks: These are designed to be mounted on DIN rails, making them ideal for industrial applications.
- Barrier Terminal Blocks: These have a more traditional design and are commonly used in household electrical systems.
- Pluggable/Disconnect Terminal Blocks: These allow for easy disconnection of wires without having to unscrew terminals.
- Feed-Through Terminal Blocks: These have two rows of connections, allowing wires to pass through from one side to the other.
Be sure to choose a terminal block suitable for your specific needs and project requirements.

Step 2: Prepare Your Wires
Once you have selected the appropriate terminal block for your project, the next step is to prepare your wires. Proper preparation ensures reliable connections and reduces the risk of electrical faults. Start by measuring the length of wire you will need to reach the terminal block comfortably. Then, using a wire stripper, carefully remove about 1/4 inch of insulation from the end of the wire.
Step 3: Insert Wires into Terminal Block
Once your wires are properly prepared, it’s time to insert them into the terminal block. If available, begin by identifying the appropriate terminal slots for each wire according to your wiring diagram. Carefully insert the stripped end of each wire into the designated slot without bending or twisting it, as this could lead to poor connection or wire damage. Ensure the wire is fully seated in the terminal, ensuring adequate surface contact for a solid electrical connection.
After the wires are in place, securing them firmly is crucial. Depending on the type of terminal block you’re using, this may involve tightening a screw or engaging a clamp mechanism that holds the wire in position. Use your screwdriver to gently but firmly tighten the screw, ensuring the connection is snug but not overly tight, which could strip the screw or damage the wire.
Additionally, if you’re working with multiple cables into a single terminal, make sure that none of the copper strands of the wire are exposed outside the terminal block, as this can create potential short circuits. Finally, double-check all installed wires to ensure they are secure and inserted adequately before moving on to the next step of your project.
Step 4: Secure the Connections
After inserting the wires into the terminal block, the next crucial step is to secure the connections. This ensures that the cables stay in place and maintain a reliable electrical connection over time. For screw-type terminal blocks, use your screwdriver to tighten the screws on each terminal, ensuring they are snug but not overly tight to prevent damage to the wires.
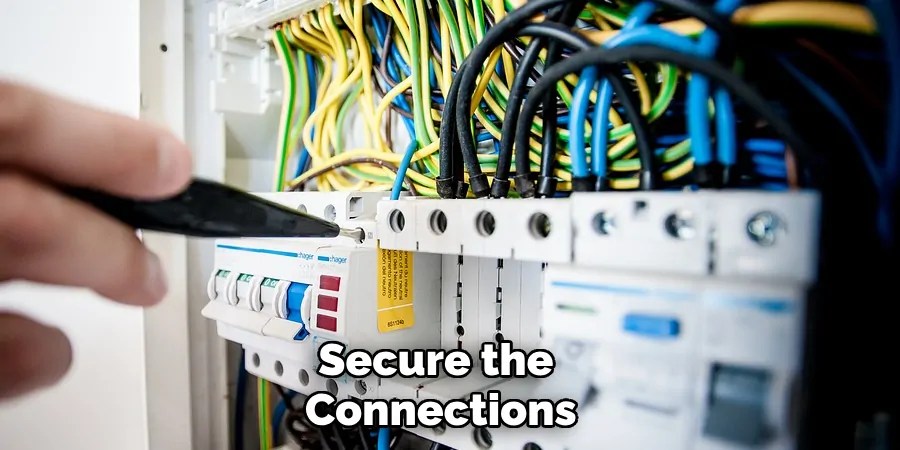
If you’re using a clamp-type mechanism, simply engage the clamp to hold the wires firmly in position. It’s important to verify that no bare wire strands are exposed outside the terminal block, as this can lead to short circuits or electrical hazards. Additionally, give each connection a gentle tug to confirm that they are securely fastened and will not come loose during operation.
Step 5: Test the Connections
Once you have secured the connections, testing them to ensure everything is functioning correctly is essential. Before applying any power to the system, visually inspect each connection to confirm no exposed wires or loose fittings. Using a multimeter is advisable to check for continuity in the connections. Set the multimeter to the continuity setting and probe each terminal block connection. The connection is solid if the multimeter beeps or shows a low resistance reading.
Step 6: Organise and Label Your Wires
Once testing confirms that all connections are secure and functioning correctly, it’s time to organize and label your wires. Effective organization enhances the overall neatness of your wiring project and simplifies future maintenance or troubleshooting efforts. Begin by grouping wires according to their respective functions or circuits. You can use wire ties or clips to bundle and keep them tidy.

Use clear and durable labels that can withstand environmental conditions, mainly if the terminal block is located in an area with dust, moisture, or temperature fluctuations. Consider color coding labels for different circuits or functionalities to facilitate quick identification. Be sure to attach the labels close to the terminal block or the entry point of each wire for easy access. A well-organized and labeled system can significantly reduce confusion and increase efficiency when working with electrical systems.
Step 7: Protect Your Connections
After organizing and labeling your wires, protecting your connections from potential hazards is essential. Depending on the environment in which your terminal block is installed, various protective measures may be necessary. For installations in areas prone to moisture, consider using terminal block enclosures or boxes to shield the connections from water or dampness.
Dust covers or seals may be beneficial in industrial settings, where dust and debris are everyday. Additionally, if your project involves high-voltage or high-current applications, heat-shrink tubing can provide an extra insulation layer around the connections. Always ensure the terminal blocks comply with relevant safety standards and regulations to ensure safe operation in your application.

Step 8: Final Inspection and Documentation
With all connections protected, the final step is to conduct a thorough inspection and document your work. Begin by systematically reviewing all connections, ensuring that wire labels are visible and no tools or materials are left near the terminal block. Look for signs of wear or potential hazards, such as loose wires or inadequate insulation. Once you are satisfied that everything is in order, document the setup.
Create a wiring diagram or schematic that details the connections, wire colors, and label information for future reference. This documentation is invaluable for troubleshooting or upgrades, allowing anyone who works on the project later to understand the system without confusion. Finally, if applicable, test the entire system with power to ensure everything operates as intended, making any necessary adjustments based on the performance observed.
Step 9: Maintenance and Regular Checks
Once your wiring project is complete and functioning, it’s vital to establish a routine maintenance schedule to ensure long-term reliability and safety. Regularly inspect the terminal blocks and connections for any signs of wear, corrosion, or loosening. Look for any environmental changes affecting the connections, such as moisture accumulation or temperature fluctuations.
Additionally, periodically perform functionality tests on your system to confirm that all components are operating correctly. Keeping a log of these inspections and any maintenance performed can be beneficial for tracking the health of your electrical setup over time. Address any issues promptly to prevent potential problems and ensure the continued safe operation of your system.
Following these steps, you can confidently and effectively wire your project using terminal blocks. Always prioritize safety and proper procedures when working with electrical systems, and never hesitate to seek professional assistance.
Conclusion
How to use a terminal block is an effective way to manage your electrical connections safely and efficiently.
By following the outlined steps—from ensuring secure connections and conducting thorough testing to organizing and labeling your wires—you can create a reliable electrical setup that minimizes the risk of errors and hazards. Protecting your connections adequately, coupled with routine maintenance and documentation, forms the cornerstone of a robust system that will serve you well over time.
With proper care and attention, terminal blocks can streamline your projects and enhance safety and functionality in various applications. Always prioritize safety and follow best practices when working with electrical systems to ensure optimal performance and longevity.
Occupation: Expert in Hardware Tools
Education: Bachelor’s Degree in Mechanical Engineering
Profile:
Enrique Howard is a seasoned expert in the field of hardware tools, with a robust background in mechanical engineering that underpins his extensive knowledge and skills. Holding a degree in mechanical engineering, Enrique has cultivated a deep understanding of tool design, mechanics, and the intricacies of various hardware applications. His educational foundation empowers him to innovate and refine tools that enhance efficiency and effectiveness in a wide range of industries.
Professional Focus:
Enrique’s professional focus encompasses a diverse array of areas within the hardware tools sector, including:
- Tool Design and Development: Leveraging his engineering expertise, Enrique specializes in designing tools that meet specific user needs, ensuring optimal performance and durability.
- Material Science: Understanding the properties of various materials allows him to recommend the best tools for specific applications, enhancing safety and efficiency.
- Ergonomics: He emphasizes the importance of ergonomic design in tools, striving to create solutions that reduce user fatigue and improve comfort during prolonged use.
- Sustainability: Enrique is committed to promoting environmentally friendly practices in tool manufacturing, advocating for the use of sustainable materials and processes.
- Education and Training: Through workshops, seminars, and written content, he focuses on educating both professionals and DIY enthusiasts about tool selection, maintenance, and safe usage practices.
Throughout his career, Enrique has worked on numerous projects, collaborating with manufacturers and craftsmen to develop cutting-edge hardware solutions. His expertise spans from traditional hand tools to advanced power tools, allowing him to contribute significantly to both professional and DIY communities.
As an author, Enrique shares his insights through articles, guides, and tutorials, aimed at helping enthusiasts and professionals alike navigate the complexities of hardware tools. His passion for education and practical application drives him to continually explore new technologies and methodologies, making him a trusted voice in the hardware industry.
Whether he’s writing about the latest tool advancements or providing practical tips for tool maintenance, Enrique Howard is dedicated to empowering others with the knowledge and skills necessary to excel in their hardware endeavors.