
Are you having trouble with your car’s radiator fan? The first step in troubleshooting is to test the fan to see if it is working correctly.
How to test radiator fan with multimeter step in diagnosing and resolving cooling system issues in a vehicle. A properly functioning radiator fan ensures that the engine maintains an optimal temperature, preventing overheating and potential damage. Using a multimeter to test the radiator fan allows you to measure electrical parameters and determine if the fan receives the right current and voltage.
This guide will walk you through the steps to accurately use a multimeter for assessing the radiator fan’s performance, whether you’re a seasoned mechanic or a DIY enthusiast. With the right tools and knowledge, you can identify faults and ensure your vehicle runs smoothly and efficiently.
What Will You Need?
Before you begin, make sure you have the following tools and materials:
- Multimeter: This tool is essential for measuring voltage, resistance, and current. If you don’t have one yet, invest in a good-quality multimeter.
- Safety Gear: Always prioritize your safety when working with electrical components. Wear protective gloves and goggles to avoid accidents.
- Owner’s Manual: It’s handy to have your vehicle’s owner’s manual on hand for reference.
Once you have everything you need, let’s begin testing the radiator fan!
10 Easy Steps on How to Test Radiator Fan With Multimeter
Step 1: Locate the Radiator Fan
The radiator fan is typically located near the front of the engine bay, between the radiator and the engine. To find it, ensure your vehicle is parked on a flat surface with the ignition turned off. Pop the hood and secure it correctly with the hood support rod or latch. Once the hood is safely open, identify the radiator by looking for the large, typically metal, grille at the front of the engine compartment.
The radiator fan is usually mounted directly behind or attached to the radiator, facing the engine. It’s essential to identify the correct fan, especially if your vehicle has multiple fans for other components like the air conditioning system. Familiarizing yourself with the layout of your engine bay using the owner’s manual can also be helpful. Ensure there’s adequate lighting so you can see clearly, and take note of any obstructions that may need to be moved for straightforward access to the fan.
Step 2: Check the Radiator Fan Fuse
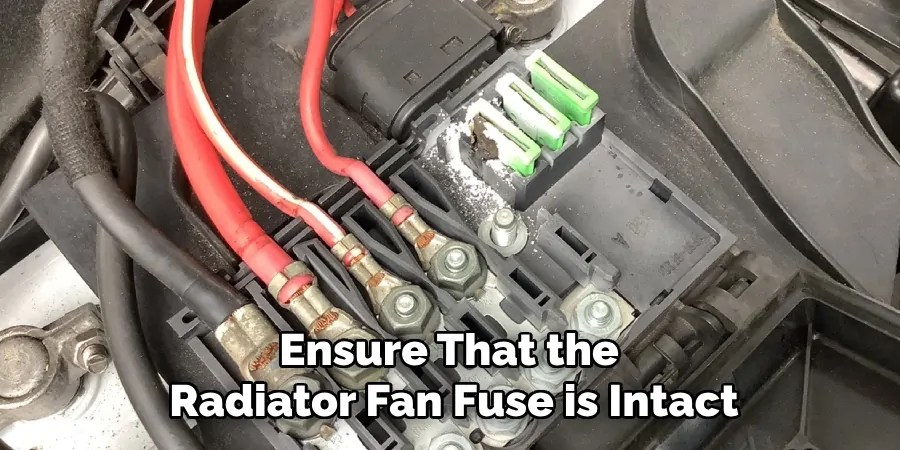
Before using the multimeter, it’s crucial to ensure that the radiator fan fuse is intact since a blown fuse could be why the fan isn’t working. Locate the fuse box, often found in the engine compartment or under the dashboard. Refer to the vehicle’s owner’s manual to identify the specific fuse designated for the radiator fan.
Once you find the correct fuse, gently remove it using a fuse puller or a pair of needle-nose pliers. Inspect the fuse closely; if the metal strip inside is broken or the fuse appears scorched, it’s blown and needs replacing. If the fuse is in good condition, slot it back into place. Use the multimeter to verify continuity across the fuse, ensuring it conducts electricity correctly.
Step 3: Inspect the Radiator Fan Relay
The radiator fan relay is another critical component that can prevent the fan from functioning correctly. To inspect the relay, first locate it. The relay box can typically be found in the engine compartment along with the fuse box. Consult your owner’s manual to identify the specific relay responsible for the radiator fan. Once located, gently remove the relay from its socket. Examine the relay for any signs of damage or corrosion which might impede its operation.
If you have a spare relay, you can temporarily swap it with the suspected faulty one to see if the fan starts working. Alternatively, use a multimeter to check if the relay’s coil and contacts are operational. Set the multimeter to the ohms setting to test the coil for continuity. Next, check for continuity in the contacts while manually engaging the relay. If either aspect fails the test, replacing the relay before proceeding is best.
Step 4: Test the Radiator Fan Motor
The fan motor is a vital component to test, as it directly affects the fan’s operation. To test the motor, you must disconnect the fan’s electrical connector, typically located near the fan shroud. Ensure your vehicle’s ignition is off and the engine is excellent before proceeding. Once disconnected, set your multimeter to the DC voltage setting and attach the probes to the fan motor’s terminals. Start the engine and allow it to reach its average operating temperature; the fan should activate automatically. Monitor the multimeter readings to confirm thatthe voltage is reaching the fan motor. If the multimeter shows no voltage, the issue may lie elsewhere in the electrical circuit.
Step 5: Test the Fan Thermoswitch

The fan thermoswitch activates the radiator fan based on the engine’s temperature. To test the thermoswitch, first, locate it using your vehicle’s owner’s manual as a guide—it’s usually found screwed into the engine block or radiator. Ensure the car is off and cool before proceeding. Disconnect the thermoswitch electrical connector to test its function. Set your multimeter to the ohms setting; a good thermoswitch will show a change in resistance as the engine temperature rises. Begin by measuring the resistance across the thermoswitch terminals with the engine cold; you should see a specific resistance value as per your vehicle’s specifications. Next, gently warm the engine to its operating temperature and measure again.
Step 6: Inspect Electrical Connections
Electrical connections are crucial for the radiator fan’s proper operation, as poor connections can lead to intermittent functionality or complete failure. Start by visually inspecting the wiring harnesses connected to the radiator fan, battery, and relevant components. Look for any visible signs of damage, such as frayed wires, corrosion, or loose connectors. If you identify any issues, resolve them by repairing the cables or replacing damaged connectors. Ensure all connections are secure and corrosion-free to provide a reliable electrical path. Using the multimeter set to the continuity mode, you can further test each section of the wiring harness to ensure no electrical circuit breaks.
Step 7: Conduct a Coolant Level and Condition Check
Inadequate coolant levels can affect the radiator fan’s operation by preventing the engine from reaching the necessary temperature for fan activation. To check the coolant level, first, ensure the engine is excellent to avoid burns or other injuries. Once cooled, locate the radiator cap or coolant reservoir. Depending on your vehicle, the reservoir might be marked with minimum and maximum levels or require removing the radiator cap to check directly. If the coolant is below the recommended level, add the appropriate type of coolant as specified by your vehicle’s manufacturer’s guidelines. Also, inspect the coolant’s condition; it should be free of debris and have a proper color, usually blue, red, or green.
Step 8: Verify the Temperature Sensor

The temperature sensor plays a vital role in the functioning of the radiator fan by monitoring the engine’s heat levels and signaling the fan to engage when necessary. To verify the temperature sensor’s functionality, start with a visual inspection, ensuring the sensor and its wiring are free from damage or corrosion. Refer to your vehicle’s service manual to identify the sensor’s location, typically near the engine block or housed within the cooling system’s components. Disconnect the sensor’s electrical connector to prevent interference during testing. Using a multimeter set to the ohms reading, measure the sensor’s resistance at various engine temperatures, ensuring that it aligns with the manufacturer’s specifications.
Step 9: Test the Fan Control Module
The fan control module is an electronic unit that manages the operation of the radiator fan, ensuring it runs efficiently based on the vehicle’s cooling requirements. To test the fan control module, begin by locating it, which is often found near the radiator or mounted within the engine compartment. Refer to your vehicle’s service manual for exact location details. Once located, conduct a thorough visual inspection of the module and its connections, looking for signs of damage or corrosion that could hinder performance. With the ignition off, disconnect the module’s electrical connectors to gain access for testing.
By following these steps, you can troubleshoot your vehicle’s radiator fan and make any necessary repairs to ensure it runs efficiently and keeps the engine at an optimal temperature.

Conclusion
How to test radiator fan with multimeter is an essential skill for diagnosing fan-related issues and ensuring your vehicle’s cooling system operates effectively.
You can identify any faulty components that may impede the fan’s performance by systematically checking the fan motor, thermoswitch, electrical connections, coolant level, temperature sensor, and fan control module. Utilizing a multimeter allows precise measurement of voltage, resistance, and continuity, offering a detailed insight into the electrical health of the fan system. Such proactive diagnostics help prevent overheating and maintain the engine’s longevity, safeguarding against potential breakdowns and costly repairs.
Regular maintenance and testing are crucial to promoting optimal engine function and reliability.
Occupation: Expert in Hardware Tools
Education: Bachelor’s Degree in Mechanical Engineering
Profile:
Enrique Howard is a seasoned expert in the field of hardware tools, with a robust background in mechanical engineering that underpins his extensive knowledge and skills. Holding a degree in mechanical engineering, Enrique has cultivated a deep understanding of tool design, mechanics, and the intricacies of various hardware applications. His educational foundation empowers him to innovate and refine tools that enhance efficiency and effectiveness in a wide range of industries.
Professional Focus:
Enrique’s professional focus encompasses a diverse array of areas within the hardware tools sector, including:
- Tool Design and Development: Leveraging his engineering expertise, Enrique specializes in designing tools that meet specific user needs, ensuring optimal performance and durability.
- Material Science: Understanding the properties of various materials allows him to recommend the best tools for specific applications, enhancing safety and efficiency.
- Ergonomics: He emphasizes the importance of ergonomic design in tools, striving to create solutions that reduce user fatigue and improve comfort during prolonged use.
- Sustainability: Enrique is committed to promoting environmentally friendly practices in tool manufacturing, advocating for the use of sustainable materials and processes.
- Education and Training: Through workshops, seminars, and written content, he focuses on educating both professionals and DIY enthusiasts about tool selection, maintenance, and safe usage practices.
Throughout his career, Enrique has worked on numerous projects, collaborating with manufacturers and craftsmen to develop cutting-edge hardware solutions. His expertise spans from traditional hand tools to advanced power tools, allowing him to contribute significantly to both professional and DIY communities.
As an author, Enrique shares his insights through articles, guides, and tutorials, aimed at helping enthusiasts and professionals alike navigate the complexities of hardware tools. His passion for education and practical application drives him to continually explore new technologies and methodologies, making him a trusted voice in the hardware industry.
Whether he’s writing about the latest tool advancements or providing practical tips for tool maintenance, Enrique Howard is dedicated to empowering others with the knowledge and skills necessary to excel in their hardware endeavors.