
A thermostatic mixing valve (TMV) is a crucial component in plumbing systems, designed to blend hot and cold water to deliver a safe and constant water temperature at the point of use. This device is particularly important in settings such as hospitals and homes with young children, where the risk of scalding is a significant concern. By maintaining the desired water temperature, TMVs not only enhance comfort but also promote safety and efficiency in water usage.

Testing these valves regularly ensures their proper function, helping to prevent temperature fluctuations that could lead to accidents or inefficient water heating. In this guide, we will outline how to test a thermostatic mixing valve and ensure optimal performance.
What is a Thermostatic Mixing Valve (TMV) and Its Purpose?
A thermostatic mixing valve (TMV) is a mechanical device engineered to regulate the mixing of hot and cold water to achieve a predetermined safe output temperature. By automatically adjusting the ratio of hot and cold water, the TMV helps prevent scalding injuries, particularly in environments where vulnerable populations are present, such as children and the elderly. The primary purpose of a TMV is to ensure safe water temperatures at faucets and showerheads, providing peace of mind while also enhancing energy efficiency by minimizing unnecessary hot water usage. In essence, TMVs play a critical role in both safety and comfort in plumbing systems across various settings.

Why Test a Thermostatic Mixing Valve?
Regular testing of a thermostatic mixing valve (TMV) is essential to ensure its reliability and safety. Over time, factors such as sediment buildup, wear and tear, and changes in water pressure can cause the valve to malfunction, potentially leading to dangerously high water temperatures. By routinely checking the performance of a TMV, users can identify any discrepancies in output temperature, ensuring that water remains at a safe level for use.
Additionally, regular testing can help detect and prevent leaks or other issues that may arise from degradation, promoting efficient water usage and reducing wastage. Ultimately, consistent maintenance of a TMV not only safeguards individuals from injury but also optimizes the overall efficiency of the plumbing system.
10 Methods How to Test a Thermostatic Mixing Valve
1. Understand the Function of the Thermostatic Mixing Valve
Before testing, it’s important to understand how a thermostatic mixing valve works. A TMV blends hot and cold water to achieve a desired output temperature, using a thermostatic element that adjusts the mix based on temperature changes. When water is drawn from the tap or shower, the valve responds to maintain the set temperature, compensating for fluctuations in hot or cold water supply. Knowing this function helps in identifying whether the valve is performing its role correctly or if there are issues affecting its performance.
2. Ensure Safety Before Testing
Safety is a top priority when working with plumbing components. Before you begin testing the thermostatic mixing valve, make sure the water supply is turned off. Allow the system to cool if it has been operating to avoid burns or injuries. Also, place a container or towels under the valve to catch any water that might spill during the test. By following these safety precautions, you ensure a safe working environment and protect yourself and your property from potential damage.
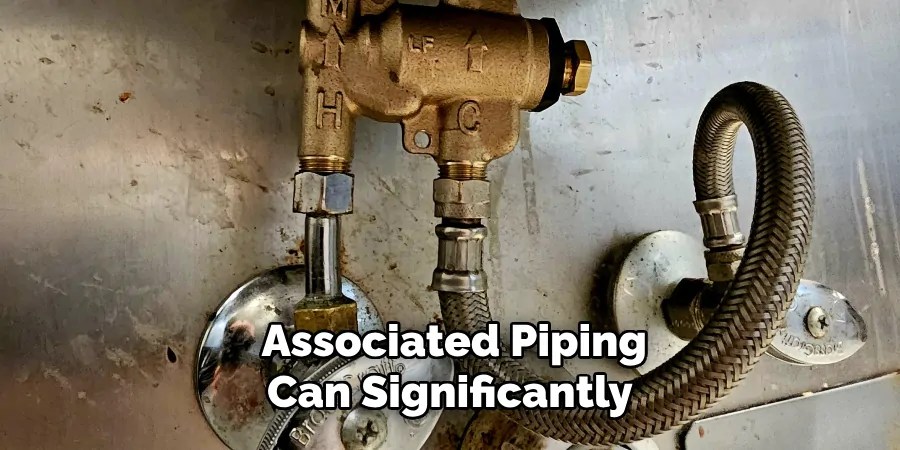
3. Inspect the Valve for Physical Damage
A visual inspection of the thermostatic mixing valve can reveal signs of physical damage or wear. Check for leaks, corrosion, or any visible cracks in the valve body. Ensure that all connections are secure and that there are no signs of water damage around the valve area. Physical damage or deterioration can affect the valve’s ability to regulate temperature accurately and may indicate the need for repair or replacement. A thorough visual inspection is a good starting point for diagnosing potential issues.

4. Verify the Temperature Setting
The thermostatic mixing valve should have a temperature setting that can be adjusted according to user preferences. Check the temperature dial or setting on the valve to ensure it is set to the desired temperature. Some TMVs have a lockable setting to prevent accidental adjustments, so ensure that the setting is correct and matches the user’s requirements. Verify that the temperature setting on the valve aligns with the temperature you want to achieve at the tap or shower.
5. Measure the Outlet Water Temperature
To test the performance of the thermostatic mixing valve, measure the temperature of the water coming from the outlet. Turn on the tap or shower and let the water run for a few minutes to stabilize the temperature. Use a calibrated thermometer or a temperature measuring device to record the outlet water temperature. Compare this reading to the set temperature on the valve. The outlet temperature should closely match the set temperature; significant deviations may indicate a malfunctioning valve.
6. Check the Hot and Cold Water Inlet Temperatures
Testing the hot and cold water inlet temperatures can help diagnose issues with the thermostatic mixing valve. Measure the temperature of the water coming from both the hot and cold inlets to the valve. Use a thermometer to obtain accurate readings. The TMV should be able to blend these inlet temperatures to achieve the desired outlet temperature. If there is a large discrepancy between the inlet temperatures and the output temperature, the valve may not be mixing the water correctly.
7. Test for Temperature Stability
A properly functioning thermostatic mixing valve should maintain a consistent water temperature despite fluctuations in the supply temperature. Test the valve’s ability to stabilize temperature by running hot and cold water through the system and observing any changes in outlet temperature. The valve should quickly adjust to any fluctuations and maintain a steady output temperature. If the temperature fluctuates significantly, the valve may be failing to regulate temperature properly and might require adjustment or replacement.

8. Examine the Flow Rate
The flow rate through the thermostatic mixing valve can also impact its performance. Test the flow rate by measuring the amount of water that passes through the valve over a specified period. Compare the measured flow rate to the manufacturer’s specifications for the valve. A reduced flow rate can affect the valve’s ability to mix water effectively and maintain a consistent temperature. If the flow rate is below the expected range, check for obstructions or issues within the valve that could be affecting its performance.
9. Check for Proper Valve Operation
Manually check the operation of the thermostatic mixing valve by adjusting the temperature setting and observing the changes in outlet temperature. Make small adjustments to the temperature dial and allow time for the valve to respond. The outlet temperature should change in accordance with the setting adjustments. If the valve does not respond or if there is a delay in adjusting the temperature, it may indicate a problem with the valve mechanism or the thermostatic element.
10. Consult Manufacturer’s Specifications and Maintenance Guidelines
Finally, consult the manufacturer’s specifications and maintenance guidelines for the thermostatic mixing valve. The manufacturer’s documentation will provide detailed information on the valve’s operating parameters, temperature ranges, and maintenance requirements. Comparing your test results to these specifications helps ensure that the valve is functioning correctly and within the designed parameters. Follow any recommended maintenance procedures or troubleshooting steps outlined in the documentation to address any issues.
Things to Consider When Testing a Thermostatic Mixing Valve
When conducting tests on a thermostatic mixing valve, there are several important factors to keep in mind to ensure accurate results and maintain safety. Firstly, always ensure that the testing environment is safe; verify that the water supply is turned off and the system is cool before proceeding.
Additionally, be mindful of the surrounding area to prevent slips or spills that could lead to accidents. Secondly, consider the condition of the water supply pipes, as any obstructions or damage in the pipes can affect the valve’s performance. Regular maintenance and inspection of both the valve and associated piping can significantly extend the life of your plumbing system and ensure reliable operation.
Common Mistakes to Avoid When Testing a Thermostatic Mixing Valve
When testing a thermostatic mixing valve, avoiding common mistakes can significantly enhance the accuracy of your evaluation. One frequent error is neglecting to allow the system to stabilize before taking temperature readings; it’s essential to let the water run for a few minutes to ensure an accurate measurement of the outlet temperature. Another mistake is using inaccurate or uncalibrated thermometers, which can lead to misleading results.
It’s also crucial not to overlook safety precautions; failing to ensure that the water supply is turned off or that the system is cool can expose you to hazards. Additionally, ignoring the manufacturer’s specifications can result in improper testing methods.
Conclusion
Testing a thermostatic mixing valve involves understanding its function, ensuring safety, and conducting various tests to verify its performance. By inspecting the valve for damage, measuring temperatures, and checking for stability and flow rate, you can diagnose potential issues and ensure that the valve maintains the desired water temperature effectively. Thanks for reading, and we hope this has given you some inspiration on how to test a thermostatic mixing valve!
Occupation: Expert in Hardware Tools
Education: Bachelor’s Degree in Mechanical Engineering
Profile:
Enrique Howard is a seasoned expert in the field of hardware tools, with a robust background in mechanical engineering that underpins his extensive knowledge and skills. Holding a degree in mechanical engineering, Enrique has cultivated a deep understanding of tool design, mechanics, and the intricacies of various hardware applications. His educational foundation empowers him to innovate and refine tools that enhance efficiency and effectiveness in a wide range of industries.
Professional Focus:
Enrique’s professional focus encompasses a diverse array of areas within the hardware tools sector, including:
- Tool Design and Development: Leveraging his engineering expertise, Enrique specializes in designing tools that meet specific user needs, ensuring optimal performance and durability.
- Material Science: Understanding the properties of various materials allows him to recommend the best tools for specific applications, enhancing safety and efficiency.
- Ergonomics: He emphasizes the importance of ergonomic design in tools, striving to create solutions that reduce user fatigue and improve comfort during prolonged use.
- Sustainability: Enrique is committed to promoting environmentally friendly practices in tool manufacturing, advocating for the use of sustainable materials and processes.
- Education and Training: Through workshops, seminars, and written content, he focuses on educating both professionals and DIY enthusiasts about tool selection, maintenance, and safe usage practices.
Throughout his career, Enrique has worked on numerous projects, collaborating with manufacturers and craftsmen to develop cutting-edge hardware solutions. His expertise spans from traditional hand tools to advanced power tools, allowing him to contribute significantly to both professional and DIY communities.
As an author, Enrique shares his insights through articles, guides, and tutorials, aimed at helping enthusiasts and professionals alike navigate the complexities of hardware tools. His passion for education and practical application drives him to continually explore new technologies and methodologies, making him a trusted voice in the hardware industry.
Whether he’s writing about the latest tool advancements or providing practical tips for tool maintenance, Enrique Howard is dedicated to empowering others with the knowledge and skills necessary to excel in their hardware endeavors.