
Testing a car amplifier with a multimeter is an essential skill for anyone looking to maintain or troubleshoot their in-vehicle sound system. A multimeter can help you diagnose a variety of issues by measuring voltage, current, and resistance within the amplifier’s circuits. Understanding how to use this tool effectively will not only ensure your amplifier is functioning at its best but also help prevent further damage to your audio system.
This guide on how to test a car amplifier with a multimeter will take you through the steps necessary to use a multimeter effectively, providing practical tips for identifying and resolving common amplifier problems.
Why Test a Car Amplifier with a Multimeter?
Before we dive into the testing process, let’s first understand why it is necessary to test a car amplifier with a multimeter. Car amplifiers are complex electronic devices that can malfunction for various reasons. Testing your amplifier periodically not only ensures it is functioning correctly but also helps identify any potential issues before they become severe problems.
Moreover, since amplifiers are responsible for powering your entire sound system, an issue with the amplifier can result in poor audio quality or even damage other components of the system. Regularly testing your amplifier will help you catch any problems early on and prevent further damage or costly repairs.
Tools Required
To test your car amplifier with a multimeter, you will need the following tools:
Multimeter:
This is a device used to measure voltage, current, and resistance. It is essential to have a multimeter with both digital and analog capabilities for more accurate readings.
Test Leads:
These are the cables that connect the multimeter to the amplifier’s circuits. It is crucial to have high-quality test leads, as poor connections can result in inaccurate readings or damage to your multimeter.

8 Step-by-step Guidelines on How to Test a Car Amplifier With a Multimeter
Step 1: Power Off
Before beginning any testing, ensure that the car’s ignition and the amplifier are completely powered off. This step is crucial to prevent any accidental short circuits or damage to the amplifier or other components of your vehicle’s electrical system. Additionally, it mitigates the risk of receiving an electrical shock during the testing process.
Always double-check that the power is off by seeing that all indicator lights on the amplifier are extinguished and no humming or noise is emitting from the audio system.
Step 2: Disconnect the Amplifier
Once you have ensured that the power is off, the next step is to disconnect the amplifier from the vehicle’s power source and audio system. This involves carefully unplugging the power cable and any associated input and output cables from the amplifier. Make sure to label or take note of the connections, as this will make the reinstallation process smoother.
By disconnecting the amplifier, you ensure that it is isolated from any interference or power surges during the testing process, which helps to get more accurate readings when you proceed with the measurements using your multimeter.
Step 3: Set the Multimeter to DC Voltage
Since amplifiers run on direct current (DC), it is necessary to set your multimeter to measure DC voltage. Most multimeters have a designated setting for this, marked as “VDC” or “DCV.” Make sure you select the appropriate range, usually between 0-20 volts, depending on your amplifier’s power rating.
The voltage reading provided by your multimeter will help you determine if the amplifier is receiving enough power to function correctly.
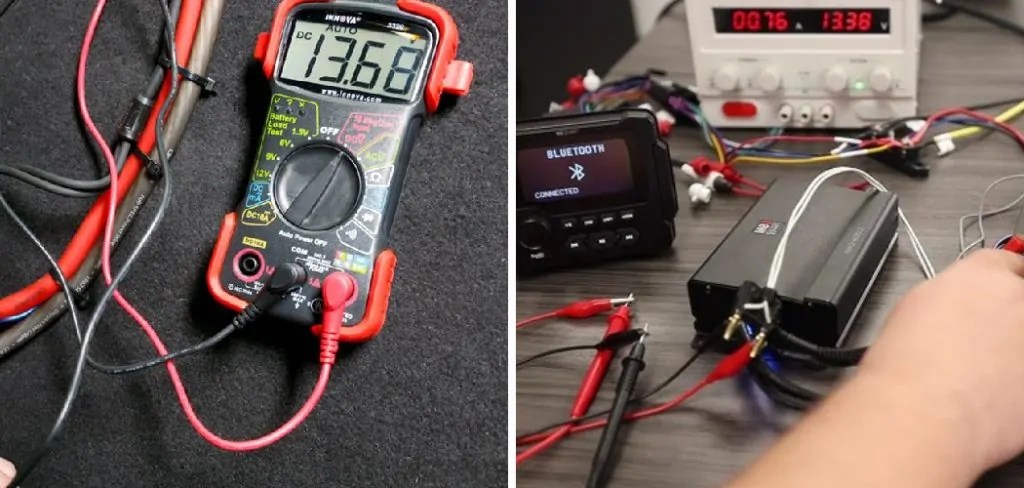
Step 4: Connect the Multimeter to the Amplifier’s Power Supply Input
Now, it’s time to connect your multimeter’s positive (red) probe to the positive (+) terminal of the amplifier’s power supply input and the negative (black) probe to the negative (-) terminal. These terminals are often labeled as such on most amplifiers.

Once connected, turn on your multimeter and check the voltage reading. The ideal reading should be close to or slightly above the amplifier’s required power rating. If you get a lower reading, it could indicate an issue with your amplifier’s power supply, such as a blown fuse or faulty wiring.
Step 5: Test the Amplifier’s Ground Connection
Since amplifiers require a solid ground connection to function correctly, it is essential to test this connection. To do so, keep the positive probe connected to the positive terminal and move the negative probe to the amplifier’s ground (GND) terminal. The ideal reading should be close to 0 volts.
If you get a higher reading, it could indicate a poor ground connection due to corroded or loose connections. It is crucial to address this issue as it can lead to distortion or noise in your audio system.
Step 6: Measure Voltage Across Speaker Outputs
Next, you need to test the amplifier’s speaker outputs. To do this, reconnect the power cable and switch on your multimeter to measure AC voltage. Then, connect the positive probe to one of the speaker output terminals and the negative probe to a ground point on the amplifier.
Repeat this process for each output terminal and ensure that all readings are similar. If you get significantly different readings or a 0-volt reading across all terminals, it could indicate an issue with your amplifier’s output circuit or faulty wiring.
Step 7: Test RCA Inputs
If your amplifier has RCA inputs for connecting audio devices such as radios or CD players, you can use your multimeter to test these connections. Set your multimeter to measure AC voltage and connect the positive probe to the RCA input’s center pin and the negative probe to a ground point on the amplifier.
If you get a reading close to 0 volts, it indicates that the signal is being correctly transmitted from your audio device to the amplifier. However, if you get a higher or fluctuating reading, it could indicate a problem with your RCA cables or connections.
Step 8: Confirm Continuity of Remote Turn-On Lead
The remote turn-on lead is responsible for turning your amplifier on and off when your car’s ignition is turned on and off, respectively. To test this connection, set your multimeter to measure resistance (ohms) and connect the probes to each end of the remote turn-on lead. The ideal reading should be close to 0 ohms, indicating that the connection is solid.
If you get a higher or infinite resistance reading, it could indicate a damaged or disconnected remote turn-on lead. This can result in your amplifier not turning on or off with your car’s ignition, which can cause damage to the amplifier if left unaddressed.

Following these step-by-step guidelines on how to test a car amplifier with a multimeter with the help of a high-quality multimeter can ensure that your car amplifier is functioning correctly and prevent any potential damage to your audio system. Remember to always power off and disconnect before testing, and consult a professional if you encounter any issues or are unsure of the testing process.
Do You Need to Get Help From Professionals?
While testing your car amplifier with a multimeter can be a straightforward process for some, it might not be suitable for everyone. If you’re unfamiliar with multimeter use, uncertain about any steps, or encounter unexpected results during the testing process, it may be wise to seek professional assistance. Audio system specialists have the expertise and tools necessary to diagnose and repair issues that may not be easily identified by the average car owner.
Moreover, professionals can ensure that all components of your audio system are functioning optimally and offer advice on any upgrades or replacements needed. Opting for professional help not only reduces the risk of further damage but also saves time and effort, providing peace of mind that your car’s audio system is in expert hands.

Frequently Asked Questions
Q1: Can I Use a Multimeter to Test Other Components of My Car’s Audio System?
Yes, you can use a multimeter to test the voltage and continuity of other components such as speakers, subwoofers, and head units in your car’s audio system. However, it is essential to check the user manual or consult a professional for specific testing procedures for each component.
Q2: What Should I Do if I Get Unexpected Results During the Testing Process?
If you encounter unexpected results, it is best to stop the testing process and consult a professional. Continuing to test or attempting to fix the issue without proper knowledge can potentially cause further damage to your car’s audio system.
Q3: How Often Should I Test My Car Amplifier with a Multimeter?
It is recommended to test your car amplifier with a multimeter periodically, especially after any maintenance or upgrades to your audio system. This ensures that all components are functioning correctly, preventing potential damage and ensuring optimal sound quality.
Conclusion
Regularly testing your car amplifier using a multimeter is an essential step in ensuring its proper functioning and preventing any costly repairs.
By following these eight simple steps on how to test a car amplifier with a multimeter, you can identify any potential issues with your amplifier and take necessary action to resolve them. Remember, always prioritize safety by powering off your vehicle and disconnecting the amplifier before testing, and use caution when handling electrical components.
With proper maintenance and testing, your car amplifier can provide you with high-quality audio for years to come.
Occupation: Expert in Hardware Tools
Education: Bachelor’s Degree in Mechanical Engineering
Profile:
Enrique Howard is a seasoned expert in the field of hardware tools, with a robust background in mechanical engineering that underpins his extensive knowledge and skills. Holding a degree in mechanical engineering, Enrique has cultivated a deep understanding of tool design, mechanics, and the intricacies of various hardware applications. His educational foundation empowers him to innovate and refine tools that enhance efficiency and effectiveness in a wide range of industries.
Professional Focus:
Enrique’s professional focus encompasses a diverse array of areas within the hardware tools sector, including:
- Tool Design and Development: Leveraging his engineering expertise, Enrique specializes in designing tools that meet specific user needs, ensuring optimal performance and durability.
- Material Science: Understanding the properties of various materials allows him to recommend the best tools for specific applications, enhancing safety and efficiency.
- Ergonomics: He emphasizes the importance of ergonomic design in tools, striving to create solutions that reduce user fatigue and improve comfort during prolonged use.
- Sustainability: Enrique is committed to promoting environmentally friendly practices in tool manufacturing, advocating for the use of sustainable materials and processes.
- Education and Training: Through workshops, seminars, and written content, he focuses on educating both professionals and DIY enthusiasts about tool selection, maintenance, and safe usage practices.
Throughout his career, Enrique has worked on numerous projects, collaborating with manufacturers and craftsmen to develop cutting-edge hardware solutions. His expertise spans from traditional hand tools to advanced power tools, allowing him to contribute significantly to both professional and DIY communities.
As an author, Enrique shares his insights through articles, guides, and tutorials, aimed at helping enthusiasts and professionals alike navigate the complexities of hardware tools. His passion for education and practical application drives him to continually explore new technologies and methodologies, making him a trusted voice in the hardware industry.
Whether he’s writing about the latest tool advancements or providing practical tips for tool maintenance, Enrique Howard is dedicated to empowering others with the knowledge and skills necessary to excel in their hardware endeavors.