
When it comes to maintaining the performance of your vehicle, ensuring that your spark plugs are functioning properly is essential. Spark plugs play a crucial role in igniting the air-fuel mixture in the combustion chamber, and any malfunction can lead to reduced engine performance or even damage. One of the most effective ways to test a spark plug’s functionality is by using a multimeter. This tool can help you determine the resistance of your spark plug, indicating whether it’s in good condition or needs to be replaced.

In this guide on how to check a spark plug with a multimeter, we’ll walk you through the steps to check your spark plugs using a multimeter, helping you keep your vehicle running smoothly.
What is a Multimeter?
A multimeter is an electronic device used to measure voltage, current, and resistance. It’s a versatile tool that can be used in various applications, including testing spark plugs. There are two types of multimeters – analog and digital. Analog multimeters have a needle pointer that moves along a scale to indicate the measurement, while digital ones display the measurement on a screen.
You can purchase a multimeter at most hardware or automotive stores, and they come in different price ranges. However, investing in a good quality multimeter is recommended as it will provide accurate readings and last longer.
Needed Materials
A Multimeter:
As mentioned earlier, you can purchase a multimeter from any hardware or automotive store. Make sure to choose one with a voltage range of at least 20 volts and a resistance range of 2K ohms.
A Spark Plug Socket:
To remove the spark plug from your vehicle, you’ll need a spark plug socket that fits your specific spark plug size. You can find this information in your vehicle’s owner manual or by consulting a mechanic.
Protective Gear:
Working on your vehicle requires safety precautions, and when working with electricity, it’s essential to wear protective gear such as gloves and eye protection to avoid any accidents.
8 Step-by-step Guidelines on How to Check a Spark Plug With a Multimeter
Step 1: Turn Off the Vehicle
Before you begin testing the spark plug, ensure your vehicle’s engine is completely turned off. This is an important safety measure to prevent any accidental electrical shock or injury. Additionally, allow the engine to cool down to avoid burns from hot engine components.

Once the engine is off and cooled, you can safely proceed to remove the spark plug for testing.
Step 2: Locate the Spark Plugs
In most vehicles, the spark plugs are located on top of the engine and connected to thick rubber wires. You may need to remove a plastic cover or air intake tube to access them. If you’re unsure, consult your vehicle’s manual for guidance.
You’ll need to remove the rubber wires from each spark plug by pulling them straight out. Be careful not to grab the wires, as they may still be connected to a high-voltage source.
Step 3: Remove the Spark Plug
Once you have located the spark plugs and detached the rubber wires, use the appropriate spark plug socket to carefully remove the spark plug from the engine. Attach the socket to a ratchet and gently turn it counterclockwise to unscrew the spark plug.
Make sure to perform this step cautiously to avoid damaging the spark plug or the engine threads. Once unscrewed, retrieve the spark plug by hand, taking care not to drop it or contaminate it with debris, as this could affect the accuracy of your multimeter test.
Step 4: Set the Multimeter to Resistance
Before testing the spark plug, it’s essential to configure your multimeter correctly to measure resistance. Turn on the multimeter and select the resistance measurement mode, usually denoted by the Greek letter omega (Ω). Adjust the multimeter’s range to the 2K ohms setting, which is sufficient for testing most spark plugs.
If your multimeter is auto-ranging, it should select an appropriate range automatically. By setting it to resistance, you’ll be able to accurately measure the internal resistance of the spark plug, which helps determine its condition.
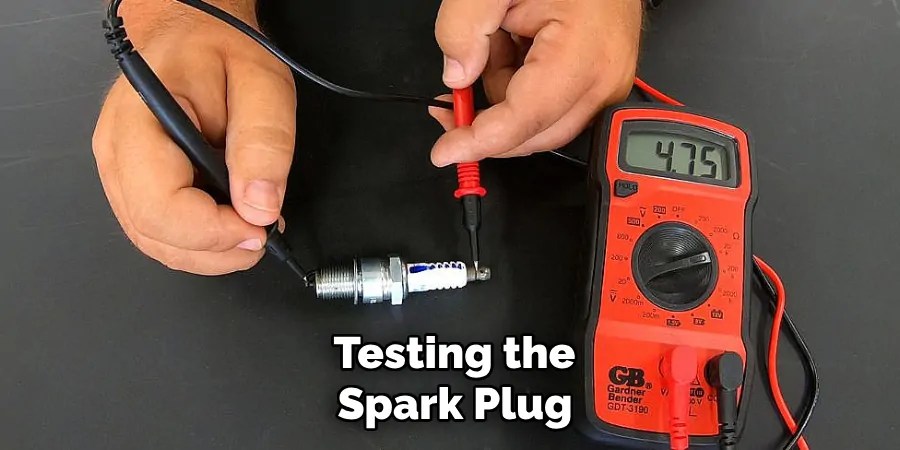
Step 5: Touch the Multimeter Probes to the Spark Plug Terminals
With the multimeter set to resistance, you can now test the spark plug. To do this, take one probe and touch it to the metal electrode at the end of the spark plug that connects to your vehicle’s engine. Then, take the other probe and touch it to either of the terminal screws on top of the spark plug.
Ensure that both probes are making a good connection with their respective points. If there is any resistance between them, your multimeter should display a reading in ohms.
Step 6: Record the Resistance Reading
After touching both probes to their designated points on the spark plug, your multimeter will display a resistance reading. A good spark plug should have a resistance between 5K ohms and 15K ohms. If the reading is lower than 5K ohms, it indicates that the spark plug is faulty and needs to be replaced.
On the other hand, if it’s higher than 15K ohms, it means that there’s excessive wear on the spark plug, and you may need to clean or adjust the gap.
Step 7: Repeat for Each Spark Plug
Once you have recorded the resistance reading for the first spark plug, proceed by repeating the above steps for each remaining spark plug in your vehicle. Follow the same process of detaching the rubber wires, removing the spark plug using the appropriate socket, and testing its resistance with the multimeter.
By checking each spark plug, you ensure that all of them are functioning correctly and do not require replacement. Consistent readings across all spark plugs typically indicate a healthy ignition system, whereas significant discrepancies may point to issues that need to be addressed.
Step 8: Reinstall the Spark Plug
After completing the test on all your spark plugs, it’s time to reinstall them. Carefully place each one back into its designated socket and use the ratchet to tighten it in a clockwise direction. Once secure, reconnect the rubber wires to their respective spark plugs.

Following these steps on how to check a spark plug with a multimeter will help you efficiently and accurately check your spark plugs using a multimeter. Regularly testing your spark plugs is an essential maintenance task that can help prevent engine misfires and improve your vehicle’s overall performance. Make sure to consult a mechanic if you encounter any issues or are unsure about the testing process. Remember, always prioritize safety when working with electricity and ensure your vehicle is turned off before beginning any maintenance procedures. Happy testing!
Frequently Asked Questions
Q: What is the Purpose of Checking a Spark Plug With a Multimeter?
A: Testing a spark plug with a multimeter helps determine its internal resistance and condition. A faulty spark plug can lead to engine misfires and poor performance, so regular testing is necessary for proper maintenance.
Q: Can I Use a Multimeter to Check Any Spark Plug?
A: Yes, you can use a multimeter to test any type of spark plug, whether it’s copper, platinum, or iridium. Just make sure that your multimeter is set to the appropriate resistance range for accurate readings.
Q: How Often Should I Test My Spark Plugs?
A: It’s recommended to check your spark plugs every 30,000 miles or as specified in your vehicle’s manual. However, if you notice any issues with your engine’s performance, it’s best to test the spark plugs immediately.
Q: Can I Clean a Spark Plug Instead of Replacing It?
A: In some cases, you may be able to clean a spark plug and restore its functionality instead of replacing it. However, if the electrode is worn or damaged, it’s best to replace the spark plug for optimal performance.
Q: What Else Can I Test With a Multimeter Besides Spark Plugs?
A: A multimeter is a versatile tool that can be used to test various electrical components in your vehicle, such as batteries, fuses, and sensors. It can also be used for troubleshooting and diagnosing other issues in your car’s electrical system.

Conclusion
Regular maintenance of your vehicle’s spark plugs is crucial for ensuring optimal engine performance and efficiency. By learning to test spark plugs with a multimeter, you arm yourself with a simple yet effective tool to assess and maintain the ignition system of your vehicle. A faulty spark plug can lead to a range of issues, from reduced fuel efficiency to engine misfires, which underlines the importance of regular testing.
Always remember to adhere to safety protocols when performing these tests, consult a mechanic if you are uncertain, and follow your vehicle’s maintenance guidelines. Regular testing not only helps in pinpointing potential problems early but can also enhance your vehicle’s lifespan and reliability on the road. Thanks for reading this article on how to check a spark plug with a multimeter.
Occupation: Expert in Hardware Tools
Education: Bachelor’s Degree in Mechanical Engineering
Profile:
Enrique Howard is a seasoned expert in the field of hardware tools, with a robust background in mechanical engineering that underpins his extensive knowledge and skills. Holding a degree in mechanical engineering, Enrique has cultivated a deep understanding of tool design, mechanics, and the intricacies of various hardware applications. His educational foundation empowers him to innovate and refine tools that enhance efficiency and effectiveness in a wide range of industries.
Professional Focus:
Enrique’s professional focus encompasses a diverse array of areas within the hardware tools sector, including:
- Tool Design and Development: Leveraging his engineering expertise, Enrique specializes in designing tools that meet specific user needs, ensuring optimal performance and durability.
- Material Science: Understanding the properties of various materials allows him to recommend the best tools for specific applications, enhancing safety and efficiency.
- Ergonomics: He emphasizes the importance of ergonomic design in tools, striving to create solutions that reduce user fatigue and improve comfort during prolonged use.
- Sustainability: Enrique is committed to promoting environmentally friendly practices in tool manufacturing, advocating for the use of sustainable materials and processes.
- Education and Training: Through workshops, seminars, and written content, he focuses on educating both professionals and DIY enthusiasts about tool selection, maintenance, and safe usage practices.
Throughout his career, Enrique has worked on numerous projects, collaborating with manufacturers and craftsmen to develop cutting-edge hardware solutions. His expertise spans from traditional hand tools to advanced power tools, allowing him to contribute significantly to both professional and DIY communities.
As an author, Enrique shares his insights through articles, guides, and tutorials, aimed at helping enthusiasts and professionals alike navigate the complexities of hardware tools. His passion for education and practical application drives him to continually explore new technologies and methodologies, making him a trusted voice in the hardware industry.
Whether he’s writing about the latest tool advancements or providing practical tips for tool maintenance, Enrique Howard is dedicated to empowering others with the knowledge and skills necessary to excel in their hardware endeavors.